Everything in it’s Right Place
Folks who know me would probably say I’m a bit of a neat freak. And although I’ve never gone so far as to alphabetize my already color-coded desk organizer collection, it is true that I like for things to have a place where they belong and make sense. This habit, while having ended a few relationships and put at least two coworkers in therapy, has served me well in my growth as a film and video editor — a craft which I have become increasingly convinced is based entirely on the idea of organization.
On the surface this seems like an obvious notion: if you want to edit video or film, you need some semblance of order to your video footage and audio so you can find everything. It’s a no brainer, right? But I think it goes deeper than that. Boiled down, the task of video editing is to arrange disparate images and sounds in such a way that they become a greater, more logical whole — that’s organization.
And if you want to get more granular and artsy with it (and let’s be honest, getting granular and artsy is what us creatives live for), you could say editing is truly the art of organized thought. If I cut from a shot of woman looking over her shoulder to a POV shot of a man in a mask coming towards her, and combine that cut with a dramatic music stinger, I’ve just made you think that something dangerous is happening. In reality the two could be friends headed to a Halloween party, but it doesn’t matter. By arranging the images and sounds in a certain way, I have tricked your mind into making the conclusion I want it to make. That’s the power of good organization.
Psh, and you thought all video editors did was cut out the bad parts…
In this series, I’m going to explore organization as it relates to the art of film and video editing and talk about how I think it can be used to improve your video edits in fundamental ways. If you’re a big geek like me and love film and storytelling theory, rest assured you’ll find plenty of that here in future posts.
For starters, though, I want to share three simple things you can do to ensure your video edits are properly prepared from the very beginning, allowing you ultimate creative freedom and avoiding major headaches later on.
1: CREATE A FILE STRUCTURE
A file structure is nothing more than a set of folders in which you store the various files related to your project. In addition to ordering your files, a structure is also a great tool for future-proofing your projects in the event of revisions or reedits down the road.
If you’ve been editing video for awhile I’d be willing to bet you’ve inherited at least one project that was nearly impossible to understand because the previous video editor either didn’t organize their files, or they did so in some labyrinthine way that would take CIA cryptographers to decipher.
Not good. But what may be even worse is coming back to a project you yourself edited months or years before and finding it a mess. Because then you have no one to blame but yourself, and you feel the shame.
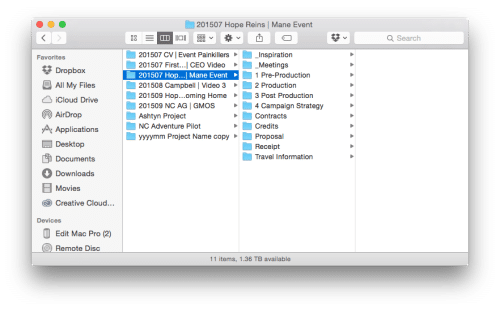
This is the structure our studio uses. It lives on my hard drives and is simply duplicated and renamed for each new project. Although it’s divided into the various stages of video production, I usually live entirely in the post folder.
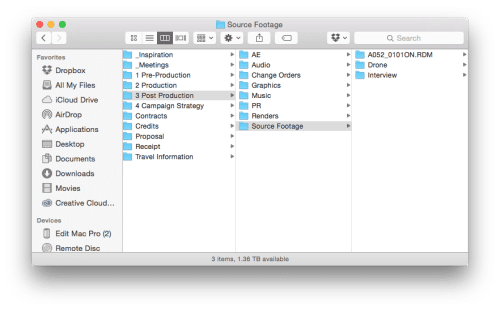
Here you can see how the structure is subdivided into even more categories and folders within the larger post folder. In truth, you can use as many or as few folders and subfolders as you feel necessary. Creating a file structure is a subjective process that will likely require some playing around until you find what’s right for you.
Just keep one thing in mind: It doesn’t matter so much what you do as long you do it the same way every time. Maintaining consistency across all of your projects allows the organization to become a usual part of your process, and repetition is how our big monkey brains learn good habits. And for that, you deserve a banana.

2: ORGANIZE YOUR PROJECT FILE
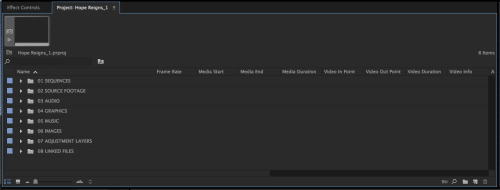
(NOTE: In the screenshots and examples here I’ll be using Adobe Premiere Pro CC 2015; however, these same concepts should translate to your Nonlinear Editor of your choice. The takeaways here are the principles behind ordering your video edits, not what buttons you press to do so.)
With your files organized on your hard drives, the next step is to bring them into your video editor. Here we are in my Premiere Pro CC project file, and right away you should see something that looks familiar: another file structure. Yep, structures within structures. Insert a tired Chris Nolan joke.
The structure I use within Premiere Pro CC isn’t unlike the one I use on my hard drives, and the two share the same goal of keeping me organized throughout the life of the project. The difference is that I will be spending a lot more time in my in-project structure than I will puttering around my disks, so I try to make it as user-friendly as possible. One way I do this is by numbering and color-coding my parent bins to ensure they stay ordered and are easy to spot at a glance.
Here again, how many parent bins is best is entirely up to you. For me, I tried to create as few parent bins as possible to keep things clean, and I ordered them according to my workflow. Your needs may differ, but the one golden rule I suggest you follow is that nothing lives outside the bins.
If you start throwing files around your project because “it’s just one song” or because you “feel your sanity drifting away,” it’s a slippery slope that leads right back to the messy, unworkable projects we’re trying to avoid.
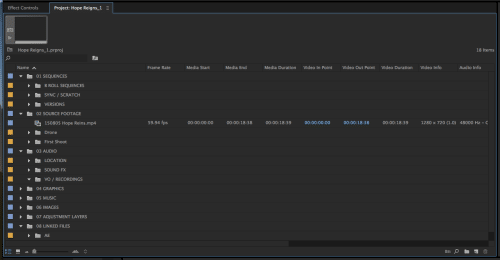
Inside the parent bins, things get a little more obsessive. In counter to my sparse approach to the parent bins, I like to have as many sub bins as I can. My ultimate goal is to have as few files of different types living together as possible (for example, if I have a bin full of photos, I might divide that bin into JPEGs and PNGs).
Herein lies another big difference between my sub bins and my parent bins: While the parent bins remain the same for every project, the number of sub bins varies depending on the size and complexity of the project at hand. I create them as I go, allowing my organization to stay as fluid as my edits, which is key.
Any good organizational system is like a pair of sweatpants: It must be able to expand and contract based on the needs of what’s being stuffed inside of it. Hows that for an elegant analogy?
At this point I think it’s important to acknowledge that, viewed so close up, this whole process can seem pretty tedious and time consuming. At the end of the day, all video editors want to do is edit videos, and putting a bunch of organizational roadblocks in your way doesn’t sound very helpful. I assure you, though, in practice and with repetition this process becomes very natural and in fact has sped up my edits tremendously.
I can’t tell you how much of my time has been freed up by simply never having to go searching for a file or a particular sequence. Instead, that time is spent actually working in the footage and being creative, and that should be every video editor’s end goal.
3: USE MULTIPLE SEQUENCES

So by now you’re probably sick to death of labeling bins and moving files around, and all you want to do is start going through your footage. And although it’s great that it’s all organized now, it may feel like your best moments of artistic genius (or, y’know, that one cool shot with the lens flare) are hiding within a nest of bins.
How do you go about getting your video footage out where you can see everything and start getting your hands dirty? That’s where sequences come in.
(ANOTHER NOTE: “Sequence” is the Premiere Pro term for your editing workspace; you may also know it as a “Timeline” or “That Thing with the Playhead.”)
Of all the benefits afforded by modern NLE’s and nondestructive editing, the ability to have a practically endless amount of sequences — and thus an endless amount of edits — is one of the most powerful and flexible.
The key, though, is in not thinking of sequences merely as edits, but as palettes where you can lay everything out and view it in a cohesive form. For one this makes it much easier to see what you’ve got to work with, but it also frees you up creatively as you can push things around and try various combos without the fear of losing anything or muddying up your main edit.
On a standard project I will usually have at least three main sequences: A sync sequence for marrying my video footage and audio, a b-roll sequence for looking through all of my shots (this is especially helpful when you have a ton of footage on, say, a documentary project), and my main editing sequence (which is renamed and duplicated to preserve each version from the rough cut all the way to the final).
Like with the sub bins, the number of sequences I use varies from project to project, and the same logic we applied to the file structure is in play here: I want to have as many sequences as I need to ensure that everything has a home and doesn’t get unwieldy.
On a particularly large project, for instance, it may be best to create multiple b-roll sequences, one for each scene or location, or for each interview to have its own sync sequence. Again, it’s all about what works for you and gives you the most control over your video footage and flexibility in your edit.
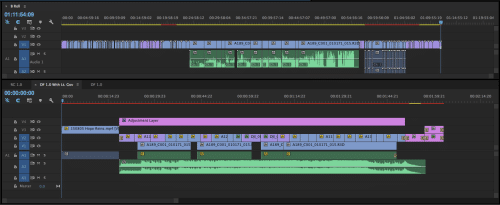
This is a topic for another post, but for editing between sequences I use a technique that’s come to be called the Pancake Timeline. It’s a fast, efficient way to edit that gives you a lot of freedom to manipulate your footage and try various options in your cut. And hey, if it’s good enough for David Fincher’s team, it’s good enough for me.
So, there you have it: Three simple but effective things you can do to get your edits organized and free yourself to be the creative, beautiful little flower you are.
Even if none of the techniques here fit your workflow or style, I hope they get you thinking about the importance of order in your projects and ways you can improve your editing process so you spend less time working around your footage and more time working with it.


